Friday, June 29, 2012

A Sharp Dressed Pest - Cucumber Beetles


(By U of I Plant Clinic Student Worker, Sean Mullahy)

These infamous garden pests come in two patterns, spotted and striped, and are fantastic at destroying all things cucurbit. So beware their interesting fashion sensibilities, and protect your garden against these nasty little pests. 

The first step to keeping them under control is proper identification. The spotted beetle is about ¼ inch in length and has yellowish green forewings with twelve distinct black spots. The striped cucumber beetles are nearly the same in size, also averaging about ¼ inch in length. These have much simpler fashion sensibilities, with two distinct black stripes running down each of their wing covers. The innermost stripe on each matches up with the one on its partner wing, making it appear as though they only have three black stripes. It can also be easy to confuse the striped cucumber beetle with the western corn rootworm. They have similar color and patterns, but the western corn rootworm has a yellow abdomen, and the striped cucumber beetle has a black abdomen. The larvae for both are striped, but spotted cucumber beetle larvae are whitish – yellow in color. Cucumber beetle larvae are much bigger than their adult stage, ranging from ½ to ¾ inches in length, and they have dark brown heads and three pairs of very short legs. 
Adult southern corn rootworm (a.k.a. spotted cucumber beetle), Diabrotica undecimpunctata howardi (R.L. Croissant, Bugwood.org).

Striped cucumber beetle (Whitney Cranshaw, Colorado State University, Bugwood.org)
Striped cucumber beetle (David Cappaert, Michigan State University, Bugwood.org)
Western corn rootworm beetle (Whitney Cranshaw, Colorado State University, Bugwood.org)

As for life cycle, both spotted and striped cucumber beetles overwinter as adults. The striped beetle is the only one that will be a big issue in early spring however, the spotted beetle has a much lower success rate in surviving the Illinois winter. It, however, can be a bigger problem in southern Illinois. Once active, they begin feeding, and can survive off the pollen and petals of many different plant species before cucurbits are planted or growing. Once the cucurbits are actively growing, they move onto these, with the ability to feed on foliage and fruits and truly devastating anything they can munch. These adults eventually lay eggs at the base of their hosts, and once hatched, the larvae will feed on the roots. Depending on location, this cycle can be repeated up to two times per season, with this only happening in warmer locales. 

If the direct damage to your tasty melons, butternuts, cucumbers, and all your other favorite hard shelled veggies wasn’t enough, the cucumber beetle also spreads a number of nasty pathogens. Throughout localized plantings, they will spread squash mosaic virus, which can be quite nasty to the fruits. They can also spread bacterial wilt of cucurbits, which affects most of your favorite fruit bearing cucurbits. 

Management of the Cucumber Beetle can be done preemptively with the application of a systemic insecticide to the soil at the time of planting. This however might be a bit much for the homegrowers out there. The only other option available is to spray a foliar insecticide when adult beetles show up.  Applications are recommended based on total adult beetle count, and if it exceeds one per ten plants at the seedling stage, or one per plant at flowering.  If you’d like to practice non-chemical control of this pest, the easiest thing to do is dress your plants in a mesh cloth to keep the pests out. The earlier the better for this method, and make sure the mesh is open enough to let in ample sunlight, while also being tight enough to keep the pests out.

Further Reading:

Friday, June 15, 2012

Sick African Violet Plant Sample

The African violet foliage showed a number of symptoms, with the majority of the sample showing mild leaf curling, bleaching, or yellowing of tissue, brittle leaves, and these symptoms seemed to affect the younger leaves more than the mature ones. It was noted that the plants were still flowering, although not as much as they had before the symptoms began appearing. What could be the problem?

Cyclamen mites can be a problem on African violet.  They can cause young leaves to be thick, hairy, deformed, brownish-green, and the cup downward.  They can be difficult to control because they can be down in the crown of the plant.  They can only be seen with a dissecting scope.  The mites must be alive and present when treated.  They can be treated with insecticidal soap or a miticide.  Read and follow label instructions.  Heavily infected plants should be destroyed to protect uninfested plants.

African Violets cannot handle temperatures below 65F at night and 70-72F during the daytime. When exposed to cold temperatures leaves can become discolored, brittle, and curl under. All of which were observed symptoms.

Too much light could also be an issue. Excessive light can lead to stunted plants with crinkled and discolored leaves.
African violets prefer a soil in the range of 6.0-6.5, and soil should be adjusted for accordingly.  A soil pH imbalance could lead to nutrient deficiency in the plant. For future adjustments, it is recommended to use something more stable such as lime or calcium, and to test the soil with a soil pH test kit.

Excess watering can also cause leaves to curl.

In addition we used the resources: How to Grow African Violets by Harrison, Heimann and Pellitteri, African Violet Care by Lerner and Dana, Growing African Violets by Cindy Haynes, and Growing African Violets by Charles Fischer (all found on the web).

Friday, June 1, 2012

Bagworms AHOY!

 
Bagworm (Thyridopteryx ephemeraeformis)
(By Sean Mullahy, U of I Plant Clinic Student Worker)

The U of I Plant Clinic received a very fun sample in today. What we thought was a bag full of fir samples to be diagnosed, also contained a freshly hatched bunch of bagworms! Bagworms are an extremely common pest of a large number of ornamental woodies, including spruce, fir, locust, pine, sycamore, and so on. Bagworms are one of the easiest pests to identify and remove, but are also one of the least controlled.
A mature, egg filled, bagworm cocoon

Baby bagworms emerge from eggs in their mother’s bag in late spring, after spending the entire winter inside. After the babies emerge they will almost immediately begin to create their own casings from whatever debris they can find. After making their casings they begin their upward climb to begin the ballooning process. Baby bagworms will feed as they climb, and upon reaching the top of their host will spin webbing of two to three feet in length, and swing off the branches of their hosts. This process is called ballooning, and eventually the wind will grab the bagworm to carry it to a new host. The bagworm hopes that this new host will be suitable, but if not they can always balloon again. After landing on a suitable host the caterpillars will begin to feed. They will start on the upper side of leaves, but quickly make their way to the underside. They prefer to feed from the tops of trees down, destroying it in their wake. As they feed throughout the season they will continually add debris to their casings to keep up with growth. Sometime in late August – early September they will reach full maturity, and find a branch to pupate on. 

Tiny, recently hatched larvae fulfilling their destiny to climb ever upwards

Pupation is around the time the bagworm lifecycle gets very interesting. Bagworms construct a large cone shaped cocoons, making identification easy. The bagworm males will emerge as moths after they finish pupating, the females however will finish the rest of their days in the homes they spent the season constructing. The males emerge as black moths with clear wings, and are about 1” in length. These will fly around hunting for female bags to mate with. Once mating has occurred, usually in late September, the female will lay her eggs in the bag. These eggs will remain dormant until the spring when the caterpillars will emerge, eat their mother’s corpse, and then begin the cycle anew. 

Recently hatched baby bagworms taking their first bites off of foliage, and beginning to build their lifelong husk companions

Bagworms are generally easy to control, if proper care is taken. The easiest time for this would be in the fall when bags have formed. Once bags have formed on host trees, they can be plucked off and collected, with burning being highly recommended. This can be before or after males have emerged from their bags, although after will ensure the destruction of eggs. The only problem with this method, however, is that getting to the uppermost branches of hosts can be difficult. It can also be quite easy to miss a large number of them hidden among the branches. So this technique can thin numbers considerably, but is not a method of complete control. Another check can also be done in spring to remove bags before hatching. If spraying is necessary, late spring or early summer, after the larvae have recently hatched is the best time to do so. If insecticide applications are delayed too far, the worms will have become too big for easy control and will most likely survive the application. It is best to get them before they balloon onto other hosts.  
A mature bagworm, in bag. 


Friday, May 25, 2012

Downy Mildew of Roses (Peronospora sparsa)


(Written by Sean Mullahy, U of I Plant Clinic Student Worker)

Downy mildew of roses is generally not a problem in the home garden; it mostly affects roses grown in the greenhouse environment. Most rose growers are familiar with its similar (in symptoms) cousin powdery mildew, although the two are very different and can be differentiated.
                Downy mildew first appeared in the 1860’s in England, and from that point on, it was reported all throughout Europe. After making its way through Europe in the early 1900’s, it made its way over to Scandinavia and the Soviet Union. Downy mildew made its way stateside in 1880, first appearing in the Midwest. Since then, it has made its way all around the United States, and to almost every corner of the globe.
Downy mildew can be identified through a number of symptoms. Watch out for purplish red to dark brown spots developing on leaves (these will be more angular in shape) and the yellowing of leaflets. These yellow leaflets may have green tissue sections of up to 1cm2 in size. Check beneath lesions for mycelia and conidia, especially under cool humid conditions. Abscission of leaves may also be quite severe. Purple to black colored spots may also appear on stems and peduncles. Downy mildew can be differentiated from powdery mildew because the grayish spores will be produced on the underside of the leaf as opposed to the top. 
               For greenhouse management, lowering the humidity should be the first step, this can be done with ventilation and aeration. Also increasing temperatures to 27C / 80F will help in controlling it; as spores are killed at this temperature. In both cases, keeping the plants aerated and dry is a great idea. Prune roses to keep them open, and try to water them at the base. This will help prevent germination of the downy mildew. For field or garden grown roses, a fungicide application is recommended. This should be done in a preventative manner, when environmental conditions are favorable for developments (cool, humid). If you already see the symptoms, it’s probably too late! The growing of a resistant cultivar is as always recommended. For example, the rugosa family of roses is resistant to downy mildew.

To prevent spread and seasonal carry over, all suspected plant parts should be removed and all infected plant material should be destroyed. 

Additional resources:


Friday, May 18, 2012

Rhizoctonia Root Rot of Soybeans


(Written by U of I Plant Clinic Student Volunteer Zu Dienle)

We have recently received a sample of soybean seedlings infected with root rot. This root rot disease is caused by a common fungus known as Rhizoctonia solani. Watch out for symptoms such as lesions and reddish discolorations near the roots and stems. Soybean seedlings may also experience stunted or irregular growth as a result of girdling at the base of the stem. The rot on the root differs from those caused by oomycetes (Pythium or Phytophthora) in the sense that it is dry. 


Rhizoctonia only causes problems if conditions are favorable and some yield losses can be observed.  Commonly in Illinois, the disease makes it presence known around the early spring when weather conditions are wet. During severe conditions, R. solani can cause up to 50 percent stand losses!  This disease is especially prevalent under stressful conditions – injuries, herbicide applications, nutrient imbalances are all possible precursors to root rot disease development.  


In order to diagnose Rhizoctonia, we place rotted root tissue under the microscope and identify the characteristic right-angled hyphae. Some other common characteristics to look out for are segmentations in the hyphae near the branching points and constrictions near these segmentations. In certain cases, the hyphae can be pigmented. 


If you find your soybean infected with R.solani, below are some management strategies that you can employ:

There is no better way to stop a problem than avoiding it at the start! Ensure that the seeds come from a disease-free, certified stock. Make sure that the seeds are all “healthy” with no visible cracks or discolorations. Certain fungicide treatments can be applied to seeds can help to control the Rhizoctonia pathogen.

When planting these seeds, make sure that the area is not a previously infected site, as R.solani can survive up to many years in the soil. Crop rotation from time-to-time to non-host is recommended.  An ideal planting site is a warm (60 Fahrenheit or 15.5 Celsius and above) seedbed with proper tillage. Ensure that the other components of the soil such as its nutrient levels and pH are adequate.
Other useful links:

Friday, May 11, 2012

Early Planted Corn with "fused coleoptile or bursting on side"


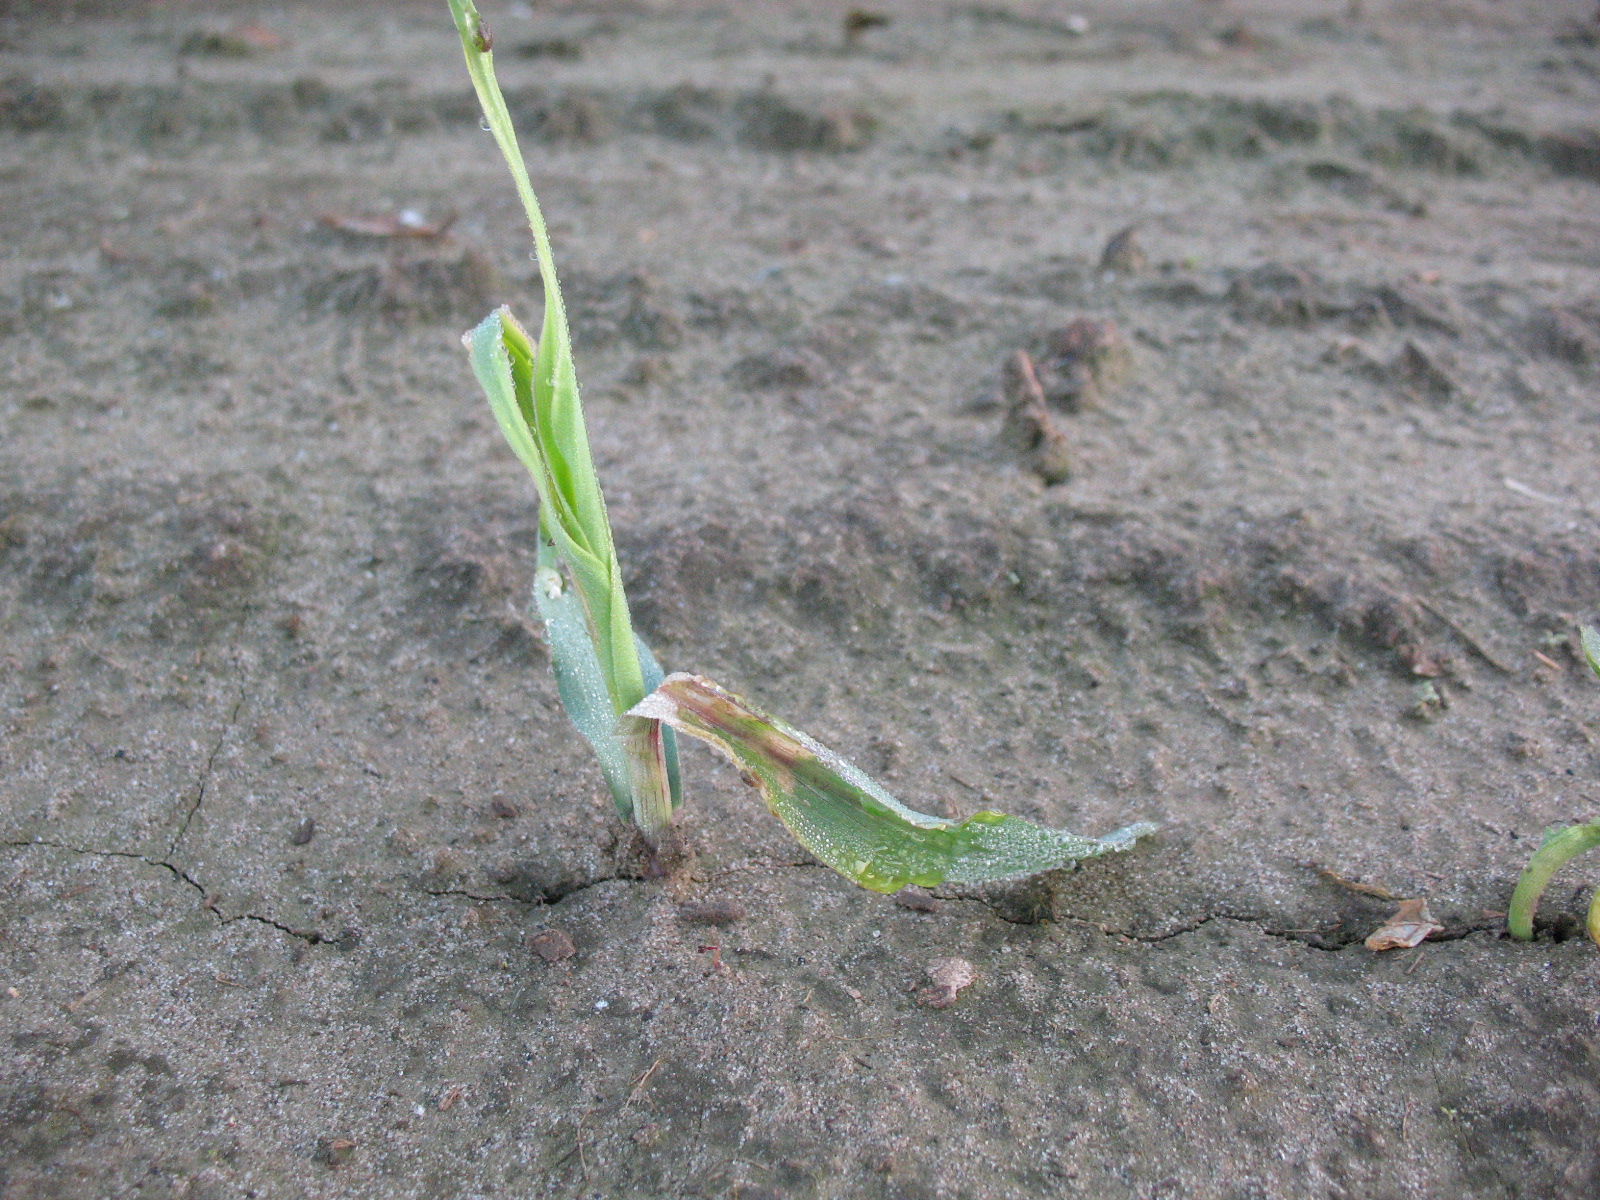
In 2011, the U of I Plant Clinic received several corn seedling samples that appeared to have a "fused coleoptile or bursting on side".  In addition, the roots appeared to be "bottle-brushed". This corn had been planted the first week of May and unfortunately, 2 weeks later, experienced cold temperatures.

I am starting to see similar symptoms again this year in 2012:


The plants did not appear to have any disease or insect damage.  The root tissue appeared healthy, but some of the roots of the plants were sparse and appeared to have "bottle-brushed" symptoms.
There are several factors or a combination of conditions that could be causing these symptoms:

   1.)  Cold imbibhition can cause a "cork screw symptoms".  Cold injury has also been linked to ""fused coleoptile or bursting on side".  Here is a link that describes cold injury to corn in depth:

http://www.grains.cses.vt.edu/publications/Diagnosing%20Chilling%20and%20Flooding%20Injury%20to%20Corn%20Prior%20to%20Emergence.pdf

2.)  Cloroacetamide herbicide (Dual, Harness, Outlook, Surpass, Bicep) can also cause twisting of the seedling shoot. However, these herbicides are not widely used at this time and these herbicides were not known to be applied in these corn fields.

I suspected that cold temperatures and wet soils could be part of this problem, but I did not like the look of the roots of some of the corn seedlings in the sample.

Pictures of one of the corn samples (similar to those of the pictures above) were sent to Dr. Emerson Nafziger.  Here are comments from Dr. Emerson Nafziger:
"While I think cool temperatures may have contributed, seed mechanical damage and herbicide can both cause symptoms like this, and it makes sense that these factors might have worked together. Checking other fields with this same seed lot planted at the same time may indicate if seed was part of the problem.
The roots do look somewhat odd, and seem to lack the proliferation we would normally see. That could be partly due to herbicide, but I suspect that cool-then-warm soil temperatures might have contributed as well. Comparing nearby fields planted at the same time might indicate temperature effects more clearly, but I doubt that by itself this contributes much to the problem."

Could genetics along with the cold/wet temperatures play a role in this problem?

Wednesday, April 4, 2012

Spruce Diagnostic Workshop

Thanks to the Illinois IPM Grant, I was able to develop a Spruce Diagnostic Workshop.  The first spruce diagnostic workshops were held at the Gardeners' Big Day at Dixon Mounds, Lewistown, Illinois.

The workshop was designed to bring awareness to home gardeners that over the last several years, we have been seeing many spruce issues in Illinois at the U of I Plant Clinic.  This is largely due to the fact that spruce are not a native to our area.  They prefer moist, well drained sites (sandy soils, hilly, or mountainous terrain) and NOT poorly drained or clay soils!  Spruces do not do well in hot and dry conditions.  Sometimes spruce problems do not start to develop until roots outgrow the area, grow into poor soil, or until weather stress aggravates the situation. Without adequate growing conditions or a proper site, spruce trees can become more susceptible to pests!  The Colorado Spruce (known to most as the "blue spruce") seems to have the most problems!

I also wanted to make participants aware that a single spruce tree could be diagnosed with many problems.

In my diagnostic workshop, everyone was given a factsheet with pictures and descriptions of the following spruce problems:  site issues, climate problems, herbicide injury, nutrient stress, Rhizosphaera needle cast, Stigmina needle blight, root and butt rot, Cytospora canker, SNEED (Sudden needle Drop), Spruce adelgid galls, Spruce spider mite, and Bagworms.

Next, I set up 8 spruce diagnostic stations with examples of Illinois spruce problems listed on the factsheet.


Each participant was given a spruce diagnostic activity sheet. By working in groups, they were told to visit each of the 8 spruce diagnostic stations and answer the questions on the spruce diagnostic activity sheet by using the spruce fact sheet as a guide.

This Diagnostic workshop help the participants to learn the following:
  • The diagnostic and management differences between Rhizosphaera needle cast and Stigmina needle blight
  • How to scout and identify spruce spider mites as well as identify the correct time to treat for these pests
  • The diagnostic signs of Cytospora canker and how to properly manage this disease
  • How to identify bagworms and adelgid galls as well as how to properly manage these pests
  • The symptoms and sources of spruce nutrient problems
  • How to properly check for spruce site problems
  • How to recognize SNEED symptoms as well as knowing that SNEED has not been proven to be a disease and it can only be diagnosed by a trained diagnostician by properly identifying their ascospores
  • How to recognize herbicide injury symptoms on spruce and to be very, careful when handling herbicide complaints.  We need to remember to rule out all other possible causes for similar symptoms as well as have the proper resources to help determine if herbicide is to blame.